Each year, over half of the remake cases that come back to our laboratory are due to an improper shade match. This is frustrating for you and your patients, and certainly is costly for all of us. But we have good news! By adding a minimal amount of effort we can achieve a substantial improvement and drastically reduce these disappointments.
Color and Shade are subjective values and involve many variables. Shade eludes exactness due to its layered quality. There are essentially three elements to shade; hue is the “color,” chroma is the concentration or saturation of the hue, and value is the lightness or darkness of a hue.
While shade tabs provide an effective start, most dentists will agree that a “perfect match” is a combination of several shade tabs and not just one.
Here are some often overlooked basics to reincorporate to improve success:
1. Measure from the same stick
When completing the prescription, please note the exact shade guide used (specify manufacturer). We have every shade guide available, however, since small variations exist between manufacturers, it is enormously helpful to have this information.
2. Take the shade at the beginning of the appointment
Please remember to take the shade before preparation.Teeth tend to lighten with dehydration and this slight nuance can lessen the accuracy of the shade communication.
3. Stump shades
Often overlooked, the inclusion of the shade of prepared teeth is extremely helpful for ensuring the correct final shade of all-ceramic restorations.
4. Operatory lighting
Most practices have replaced their lights with Natural Daylight bulbs measuring approximately 5500 Kelvin. It makes all the difference.
5. Photography
We love photos! Please include the shade tabs in your images with the etched identification of the shade clearly visible. While the shades may not be perfect, having the objective shade tab in the photo give us a great starting point. Inclusion of multiple shade tabs is also very helpful. Photos are key to communicating texture, characterization, translucency, size and shape. Photos can be sent to photos@maverickdental.com after they have been taken.
6. Five specific angles
1. Patient: Please include a full face photo of the patient smiling
Dental Patient Shade Facial

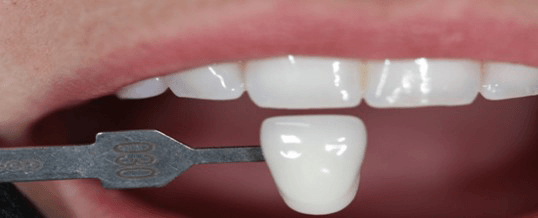
2. Shade tab: Include the incisal edge of both tooth and shade tab
Dental Shade Match Shade Tab

3. Facial view: Provide a full facial view of tooth and those adjacent
Dental Shade Match Facial View

4. Distal/Mesial: Please capture both aspects of the tooth
Dental Shade Match Distal Mesial View

5. Incisal edge: By using a dark background, translucency can best be captured and communicated

Dental Shade Incisal Edge ViewWe are committed to helping you keep your promises to your patients the first time, every time. With a bit more information properly and consistently communicated, we can all vastly improve our chances of immediate success.