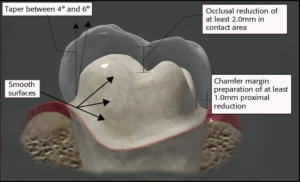
In an effort to reduce the amount of chair time needed to deliver a crown and provide a stronger, more durable device, please help us help you by following these guidelines. They assist us in shaping the all-important margin and occlusal surface to not cause any harm to the patient while still maintaining excellent aesthetics and strength.
Each year, over half of the remake cases that come back to our laboratory are due to improper shade match. This is frustrating for you and your patients, and certainly is costly for all of us. But, we have good news! By providing us with proper shade photos of your patient, we can achieve substantial improvement and drastically reduce these disappointments.
In a single weekend over 1,000 individuals received charitable dental care at the PPG Paints Arena in Pittsburgh, PA. Over the course of two full days, dentists, hygienists, assistants and lab technicians volunteered their time to help those in need at the Mission of Mercy.
The dentist-dental lab relationship is comprised of many moving parts and Maverick is constantly communicating with our clinicians. Our typical conversations range from case turnaround times and impression questions, to material considerations and technical evaluations. earlier this month Maverick got a special request from a long-time customer, Dr. Jack Spencer.
“Be a Dentist,” they said. “It’s easy. No stress at all…” Your patient is in the chair, tray in place, material surrounding the closed tray impression transfer posts. Time is up, material has set and now you attempt to dislodge the tray. Great! It’s mechanically locked into place. Now your patient is wide eyed and you’re reaching for your handpiece. “No stress at all.” What happened?